Organic flow pendant
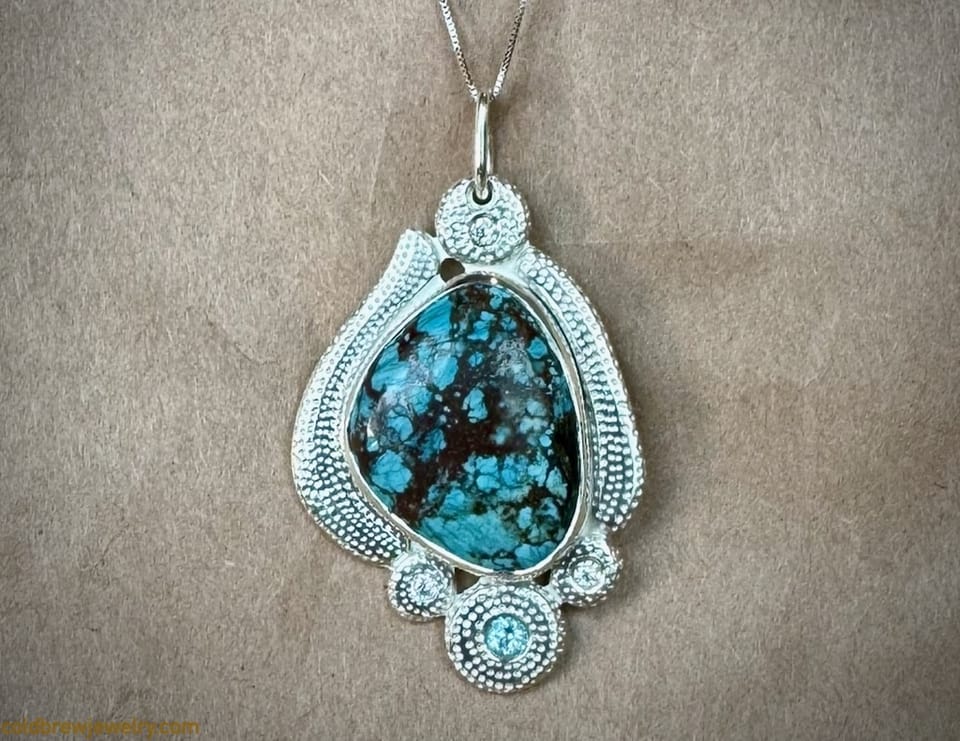
Ultimately, the goal of this project was to practice bezel setting alone. However, since I like adding detail to my pieces, it unfolded into a bigger project.
Key learnings:
- Don’t rush. Spend more time evaluating your options.
- Follow the appropriate order of operations.
- Use special soldering techniques for special cases.
- Choose the right graver for bright cutting to make your life easier.
- Make sure to modify your tools appropriately.
- Sometimes, making a tool for the job is the way to go.
To make it clear, this is not a tutorial to follow along but more like a project retrospective. I made some mistakes along the way, and now I share my thoughts on what I could have done better.
Before we continue, I want to mention that I'm not a professional silversmith. These are my learnings as a hobbyist. I'm sharing them for informational purposes only, so use them at your own risk.
Architecture
A while ago, I purchased a few cheap stones for practicing. Most of them were poorly cut and chipped. One turquoise cabochon looked better, but a scratch was near the top. Initially, I would make a simple bezel set pendant just to practice. But, as it usually happens to me, I had an idea to make it more interesting.
I admit that it’s not the best tactic to practice with silver. But this is how I started when I got into jewelry making. To some extent, it was because I simply didn’t understand the complexity of the making process. However, I also wanted to practice as close to real-life conditions as possible. Long story short, I feel more or less comfortable having my pieces in silver, even if they have mistakes and flaws and don’t necessarily look like professional pieces. I’m learning, after all. And I hope they don’t look that bad.
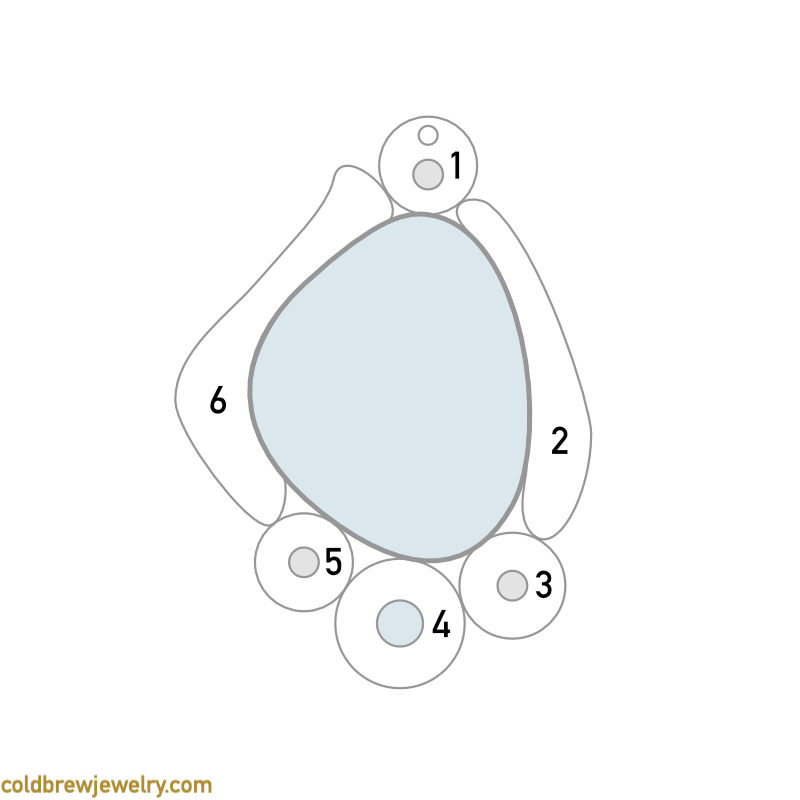
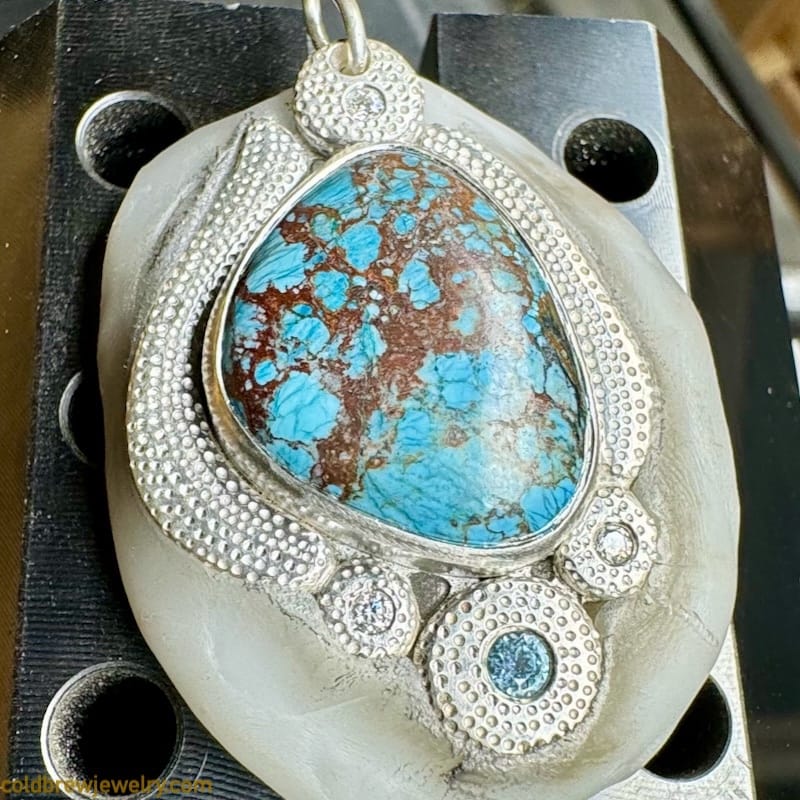
In the figure, you can see a bezel-set cabochon in the center. There are silver elements of different shapes around it. Some of them include flush-set stones 2 mm and 3 mm in diameter. It means that these elements should have enough height.
I wanted the surrounding elements to have a somewhat organic look. To achieve that, I planned to keep them relatively thick and have a texture that highlights their shape. They also had to have smooth, rounded edges.
Alternative
If we approach it from a scalable production perspective, I’d create this shape in wax and cast it. It allows for a perfect alignment of the surrounding parts to the bezel, saves a lot of metal by making the thick parts hollow, and creates a more sophisticated design. Unfortunately, I had no practice with wax or tools to work with it.
Alternative
Another thing you can do is melt some silver into an ingot and roll a relatively thick sheet. Then, you can pierce the forms to fit perfectly around the set cabochon. But I had no rolling mill to make a thick silver sheet. I also didn’t have a crucible and an ingot to cast a piece of metal for rolling.
Here’s what I had at hand:
- 20 gauge sheet of silver for the backplate,
- 26 gauge bezel wire,
- 3 mm square silver wire for forging thicker elements,
- three 2 mm moissanite stones,
- one 3 mm blue topaz,
- 18 gauge round wire for the bail,
- some silver scraps to be melted and forged into more minor round elements.
Here’s what I decided to do. Create a bezel for the cabochon first. Then, use 3 mm square wire to forge it into surrounding pieces with a hammer. Add texture to the forged pieces. Then, create a backplate for the cabochon and solder it to the bezel. The next step is to solder the forged pieces to the bezel setting and then add a simple bail. With all the soldering jobs done, create seats for the stones and set the cabochon and the faceted stones. The final step is to pre-polish and polish the piece.
Implementation
Bezel for the cabochon
The standard procedure here is to wrap the bezel wire around the stone. The 26 gauge is approximately 0.4 mm, so I easily bent the wire. Nevertheless, I had to tweak it here and there to make sure it fits well. Generally, you don’t have to anneal a relatively thin bezel wire before bending, and that’s perfectly fine. But the catch is that the wire has some springiness. And when the cabochon is irregular, you can’t simply calculate the bezel length based on circumference. So, keeping the wire tight to the stone helps. I also had to saw through the seam to get it flush before soldering, which shortened it a bit. It turned out to be a good thing because it accounted for smaller spaces and made the bezel even tighter.
Alternative
I could’ve used a piece of paper to wrap it around the stone, mark it, and calculate the length. I’d also need to add metal thickness multiplied by 3.14 (𝜋) to it.
Surrounding parts
First, I had to calculate the length of the 3 mm wire pieces. Forging will make the pieces wider and longer. There are different formulas to calculate the initial piece size before forging. The problem is that you won’t forge the wire into a perfect rectangular shape. So I usually go by eye. In this case, I cut a piece of wire slightly shorter than the resulting form.
As you can see in the figure above, there are six pieces around the bezel. I decided to forge pieces 2 and 3 and 5 and 6 together. Later, I wanted to visually separate them by adding a groove with a file. My goal was to make the whole assembly sturdier. For parts 1 and 4, I decided to melt some scrap silver into a ball and forge it into a coin-like shape.
I used the stones’ height to determine the metal thickness because I planned to flush-set them.
I annealed and forged two pieces of wire to shape them as close as possible to what you see in the figure. I didn’t do anything special to measure the amount of silver scraps to melt to get two balls of silver of an appropriate size. Measuring by eye worked well enough for me. The four parts (remember, I combined a couple) came out really well.
But when I tried to file the edge of the longer pieces to match the curvature of the cabochon, I realized that I couldn’t do it with enough precision. I just couldn’t get a good tight seam for soldering. The only thing that came to my mind was to make a larger backplate and solder the surrounding parts to it along with the bezel.
Alternative
To make my life easier, I could have marked the bezel curve on the forged piece with a scribe and sawn and filed it to that line. There’s a good chance I could have gotten an appropriate seam this way. Funny enough, the fact that I soldered the parts to the backplate saved me from another mistake that I’ll talk about in a minute.
Before soldering the parts, I wanted to add some texture to give it an organic look I was after. The idea was to use a tiny round bur to create dotted lines along the parts. The decision here was based on my bur control skills. I knew I was not perfect at it, so if the bur “ran away,” it’d be easier to clean up a separate piece rather than an assembly.
To be fair, the texture could have been a bit denser. Besides the longer pieces reminding me of small alligators, they look interesting.
This is where I mixed up the order of operations. I cut the seats for the flush-set stones after I added the texture. The issue is that the edges of the seat overlapped with the “dots,” which made it hard to burnish them later.
Backplate
After I had all the parts formed, I put them on a sheet of silver and marked the contour with a Sharpie. Well, that’s easier said than done. Pieces were moving around even with the slightest touch. I finally managed to draw a line around the pieces. Thankfully, I added a bit of cushion. This way, I’d have some space for maneuvering later when it comes to soldering. I also added a line along the inside of the bezel since I would solder it first.
Alternative
I should have used some glue or even blue tack to keep everything in place. It’d save me a bit of time, for sure.
Soldering it all together
I started with the bezel. I made some balls of solder and placed them along its inside wall. That’s because I wanted to keep the part of the backplate outside the bezel perfectly flat, and cleaning up the solder might add some uneven spots.
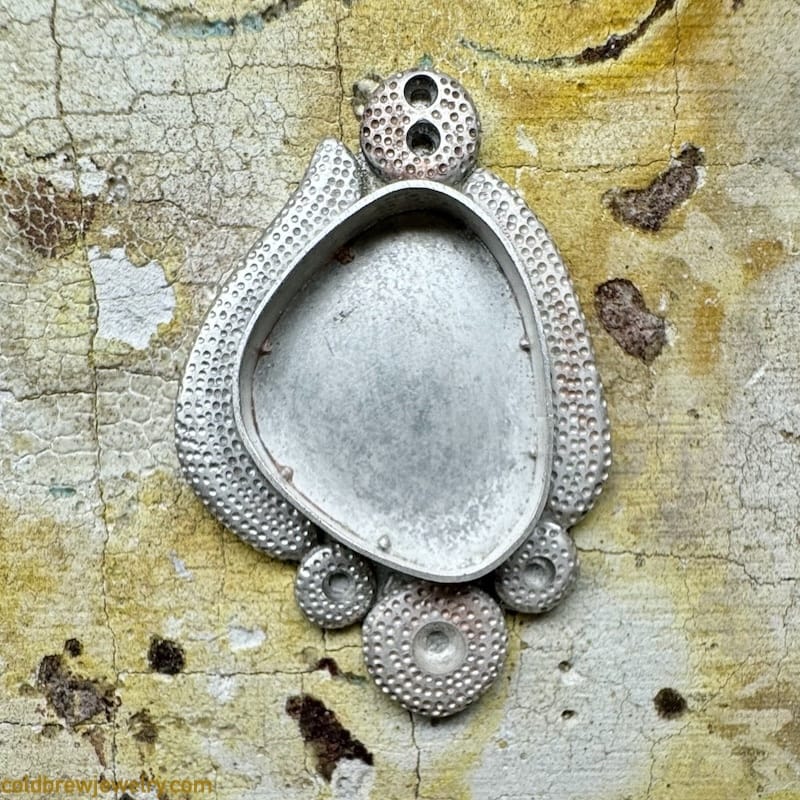
I heated the backplate to make the solder flow through the seam when soldering. While it worked fine, you can see in the figure that I had an excess of solder on the inside. My biggest struggle is probably determining the right amount of solder for larger jobs.
Alternative
Generally, it’s recommended to head the backplate from the bottom. You can use a tripod with mesh, a titanium stand, or simply two charcoal blocks to hold the backplate high enough to do that. Funnily enough, I ordered a tripod after completing this project.
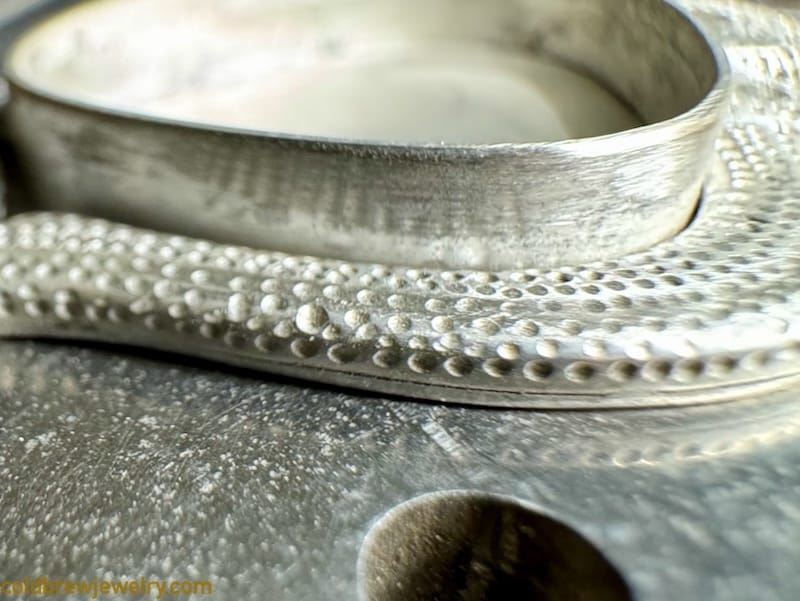
Next, it was time for the textured parts. I sanded them perfectly flat. That gave me the impression that I could place the pallions on the inside and pull the solder through the large seam. I think I could’ve succeeded if I had placed enough solder around each piece. But the way I did it resulted in an unfilled part of the seam on the outside. Also, heating the backplate from the bottom could’ve helped.
Alternative
I think a better approach would be to use sweat soldering. This way, you get more control over how the solder spreads. Depending on how much solder you put on the surface, you might need to sand it before soldering it to the backplate to make it more even.
I also soldered a simple wire bail to the top. Actually, I messed up when cutting the seat for the stone at the top, so I added another seat and used one hole to add a bail. I’m still puzzled about how it happened. The only thing I can say is don’t try to work when loud kids are around you. It may lead to unexpected results, at the very least.
Setting the stones
After cleaning up the excess solder and piercing out larger exposed spots of the backplate, it was time to set the stones. I started with the cabochon. The tricky part was that it wasn’t cut evenly. It had different heights along the perimeter. So, I had to come up with a middle ground for the bezel height, which, in turn, meant that some sides would be tricky to close.
Alternative
When setting an odd-shaped stone, it’s a good practice to bring a specific side of the bezel down to a proper height that corresponds to the stone’s part. This would reduce the graver’s work in this case.
I slightly filed the top edge of the bezel at a 45-degree angle to make it easier to burnish. My hammer handpiece helped do the job, but the bezel’s edge looked a bit uneven. This is where I decided to do a bright cut along the edge with a graver. I had my flat graver sharpened, polished, and ready to go. I don’t have a microscope, so I put on my Optivisor lenses with higher magnification. But even then, I could barely keep the graver from scratching the stone. I did the cut, but I also left a couple of scratches on the cabochon.
Alternative
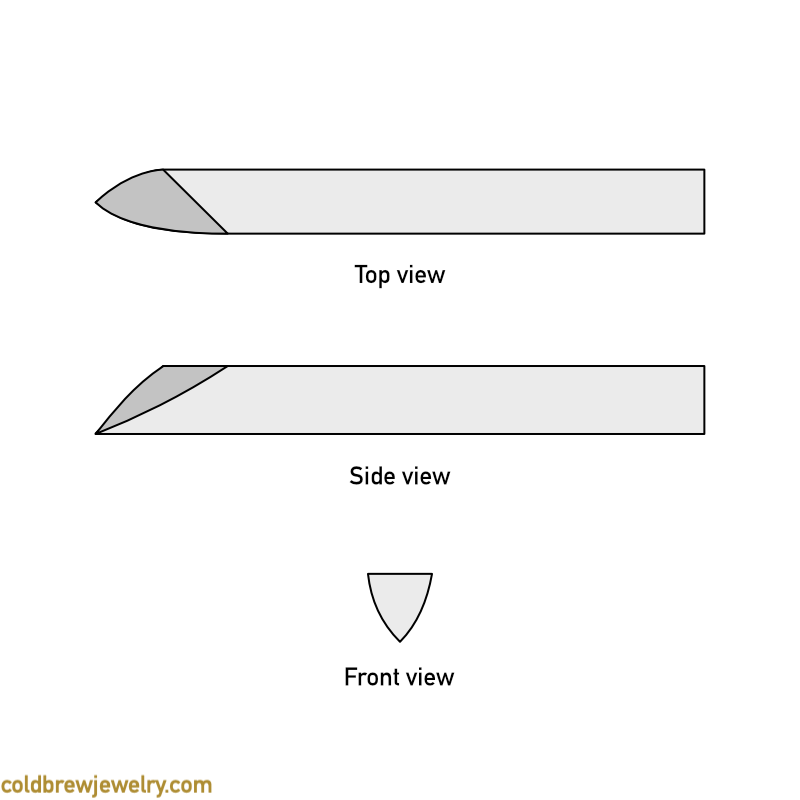
If I had spent more time considering my options and consulting some books that I have (specifically, Stonesetting for Fine Jewelry by Paul Leibold—you can find a link on the Resources page), I would have learned that a better way to add bright cuts to bezels is with an onglette graver with a side angle. This way, the side of the graver closer to the stone can be made smooth enough to have a much lower chance of scratching.
Next, I had to flush-set four faceted stones. I already had the sets cut for them, but the backplate covered the hole at the bottom. While I could have left it as is, I think cleaning the piece late would be much easier with open cults of the stones.
I went ahead and drilled the backplate through for all the stones. I’d highly recommend using a center punch, even for the small holes. My drill was slightly smaller than the existing opening, so it wandered around a bit, and I had to even out the hole after the fact. There’s nothing wrong with it, but forming a good habit is essential.
As I mentioned before, the texture I added made it more challenging to burnish the edge of the seat. I had to add a bit more pressure to burnish the metal so it held the stones. And this is where I was undone by my own negligence. The tip of my carbide needle burnisher was too sharp, and it slightly chipped the blue topaz.
Of course, I rounded and polished it appropriately right after, but there’s not much I could do about the stone. In this case, it was the practice piece, so I wrote it off as educational expenses. Oh well, lesson learned.
Another challenge I faced was using the burnisher close to the bezel when flush-setting the stones. I just couldn’t get it to the right angle. Thankfully, I had a small brass rod lying around that I bought a while ago. I used my diamond wheels to shape and polish it so I could now use it as a burnisher for flush-setting.
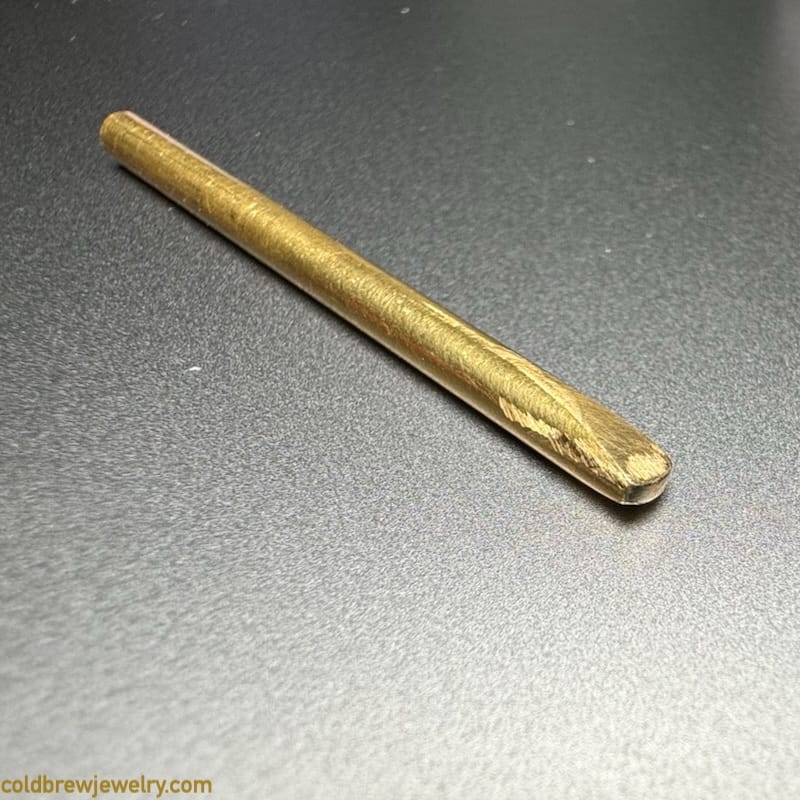
It worked brilliantly (no pun intended). First of all, brass is softer than steel. When I use this burnisher, it may touch the stones with a smooth surface. It also allows me to utilize more force when needed and, theoretically, has less chance of slipping. Win-win!
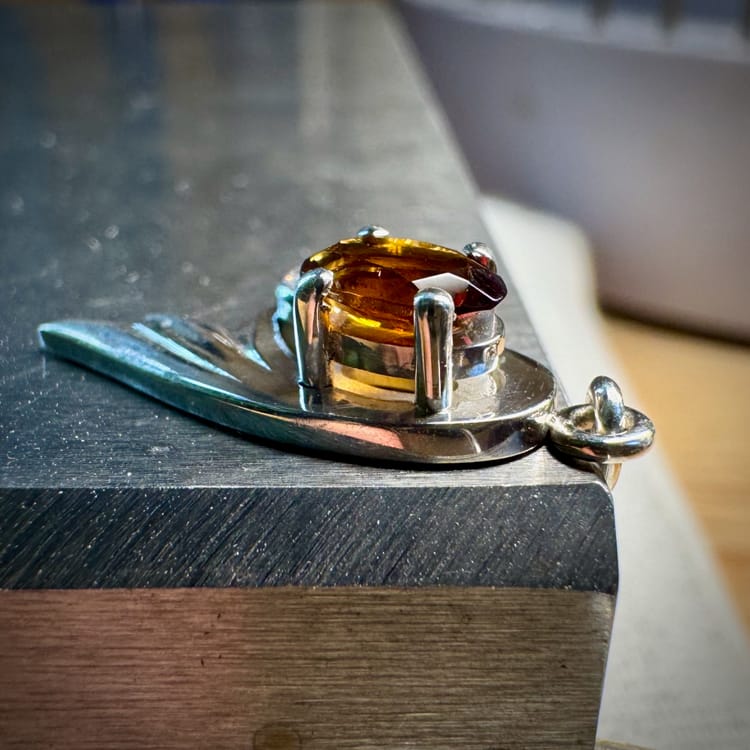
There was another thing that I missed. I cut a seat a bit too deep for one of the moissanite stones. Thankfully, I managed to close it tight enough to hold the stone in place. But the additional thickness of the backplate came to the rescue. It provided enough metal to cover the culet of the stone.
Finishing up
I polished the front side of the pendant and put a satin finish on the back. I’m still not great at following the order of operations with larger flat surfaces. I must remember to sand and pre-polish the back before adding the bail and cover it with masking tape right after. This will keep the surface flat until the final polish.
It’s possible to remove the scratches and pre-polish later, but the bail will get in the way and make things complicated.
The last thing left at this point was the scratches on the cabochon. I used my medium and extra-fine diamond wheels to remove them.
Some stones, though, including turquoise, are very porous. That’s why they are sometimes covered with a special varnish to protect them and give them more luster. If you scratch the coating, you must send the stone to a lapidary professional to restore it.
Aggressive polishing compounds may also damage these stones, so be careful when you polish your piece with the stone in place.
Conclusion
This was one of the biggest projects I’ve done so far, both time and size-wise. My main takeaway is that planning is critical for such multistep projects. It’s also important not to rush and stick to the order of operations.
As for me, I tend to miss the point when I get tired and start losing precision. Please make sure to take regular breaks to recharge.
I hope you enjoyed my retrospective. If you have any questions, don’t hesitate to DM me on Instagram.
You can find a video of the making process and more pictures in my Instagram account @coldbrewjewelry.

Member discussion