Practicing flush-setting and engraving
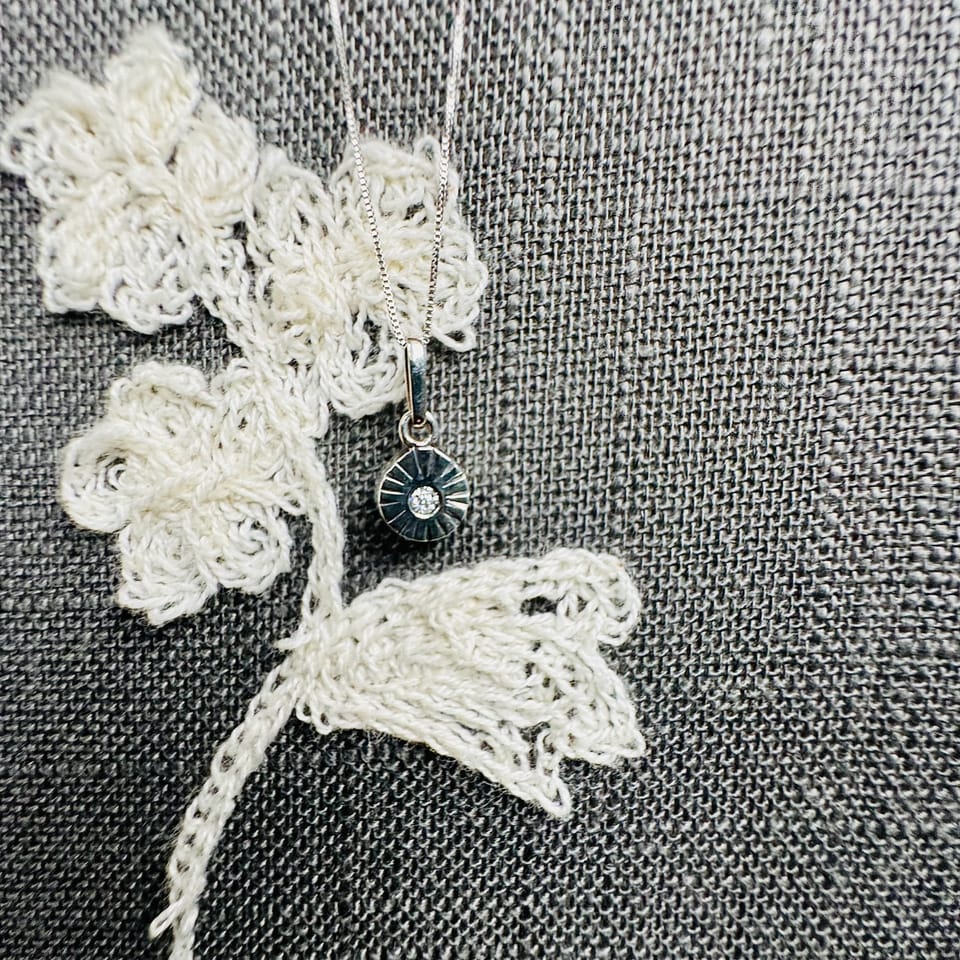
This time, I ventured into the world of flush-setting and engraving. I’ve laid out a few key takeaways, like the importance of planning your piece just right and the delicate dance of soldering without turning your precious work into a molten blob. Plus, I’ve got some simple starter tips for those itching to get their hands on gravers.
Key learnings:
Spend more time planning a proper piece architecture and order of operations.
Be extra careful to not overheat when soldering small pieces.
Holding the piece properly is very important to get the flush setting right.
You only need a few things to start with gravers.
Here's another practice piece of mine. It's a small silver pendant that looks more like a charm. It has a moissanite in the center and engraved blackened "rays" around it.
I started working on a bigger, more complex item and realized I needed to flush-set a few stones. I've never done it before, but I watched some videos from Lucy Walker inside her online jewelry-making school. Also, I have a couple of books that show different setting techniques. Depending on your practice level, I'd recommend checking with at least two books that describe flush settings. Each book gives you specific nuances that complement each other. Watching a video also helps if this is your first time doing flush setting.
Before we continue, I want to mention that I'm not a professional silversmith. These are my learnings as a hobbyist. I'm sharing them for informational purposes only, so use them at your own risk.
Archtecture
The idea was dead simple. The stone I was going to set was a 2 mm round moissanite that has a height of 1.3 mm. To set it, I’d need at least a 16 gauge sheet of silver, but I only had 18 gauge at hand. I had to create a frame so that the culet of the stone didn’t stick out. I figured that I needed three components:
- A round piece of sliver sheet approximately 7 mm in diameter.
- A 3 mm wide bezel soldered to the sheet to form somewhat like a cup shape with straight walls.
- A jump ring at the top and a bail for the chain.
Flush-setting
For me, it turned out to be easier than I expected. In general, here are the steps to flush set a stone:
- Drill a hole.
- Enlarge it with a ball bur.
- Put in a stone and burnish the metal around it.
It sounds simple, but I wanted to make it easier and repeatable for myself. Here, I'll describe some tips that helped me achieve that.
When using a ball bur to open up the seat for the stone, make sure to lubricate it often. Also, if you are using a simple ball bur (not diamond or finish bur), you need to run it at a reasonable speed. Otherwise, it catches on metal and gives you rough edges instead of smooth ones.
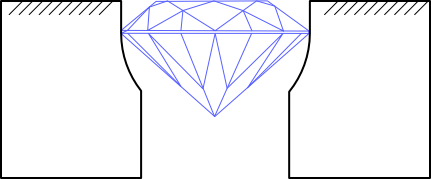
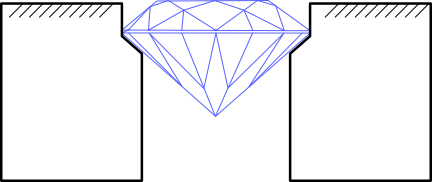
After you open the seat almost to the necessary depth, you may switch to the setting bur to adjust the seat. It will make the stone wiggle less while you burnish the metal around it.
Burnishing
This is what works for me when it comes to burnishing. I'm using a carbide needle burnisher with a tiny point. You can find one at RioGrande (item 341298). It works great, especially for smaller stones. Make sure to use stones that are hard enough so that you don't scratch them easily. In general, a flush setting is recommended for harder stones. But there are other burnisher variations that are less likely to scratch the stone.
I've heard different advice on the roundness of the needle burnisher's tip. Some jewelers prefer small but round tips for smaller stones. Some prefer almost flat tips. Some say that the tip should be smooth enough that it doesn't scratch your skin.
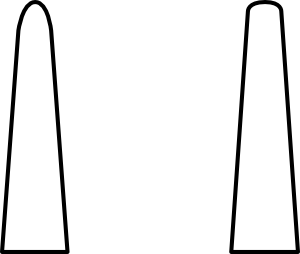
But if you think of the reason, it all comes down to the shape of the bevel. With a round tip, the bevel would be slightly round. With a less round tip, it would be more straight. The rounded tip burnishes more metal over the stone quicker. But the more "scratchy" the tip is, the more likely it can scratch or chip the stone.
Some sources advise burnishing four small areas first (S, E, N, W) and then going full circle. I use a different technique. I start with my burnisher in an almost vertical position. I go full circle at that angle and then tilt it slowly while going around the stone until I hit a 45-degree angle. At this point, the stone is set tightly.
Holding your work correctly helps to avoid slips and scratches on the metal. Generally, using a ring clamp or a rotating vise works best. I used thermoplastic to hold the piece because it was so tiny.
The downside of flush-setting is that a small amount of burr accumulates at the top. It's possible to use pumice wheels to clean it up. Be careful with files and sandpaper. They may scratch the stone because they usually have higher hardness.
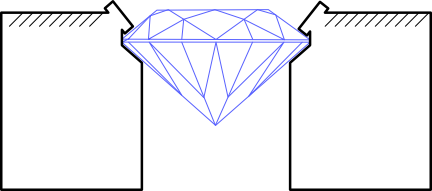
If you scratch the metal around the setting with a burnisher, you may be able to burnish the scratches depending on the form of the surface. In hindsight, I think a domed shape would work even better.
Engraving
Nevertheless, I made it a bit more interesting and added some ray-shaped lines. For that, I decided to use a graver. Engraving is a huge topic, but it's usually possible to get away with a few gravers for jewelry making. I'd use gravers primarily to add bright cuts to settings, some decorative cuts to pieces, and probably a simple graver-based setting like a star setting. In my case, I used a simple 90-degree graver, which is the easiest choice for a beginner.
When I started looking into engraving, I felt like I was opening a can of worms. But it turned out that I could start with just a few things:
- A graver.
- A handle.
- A set of diamond wheels to use with your flex shaft for shaping, sharpening, and polishing.
Since you can use gravers without heels for setting and even simple decorative cuts, it should be enough to get started. I'd recommend buying pre-shaped gravers to get faces at a proper angle right from the start.
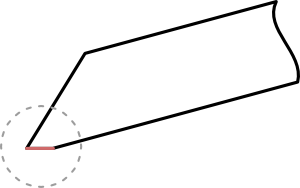
But I'm a bit of a nerd, so I couldn't just stop there. Having a heel on a graver gives you some advantages, like making it easier to do longer cuts and controlling the depth of the cut. But I'll cover this story in a separate post.
With this piece, I was making my first cuts. And while I was hoping for a slightly different look, it turned out pretty good. Ultimately, I oxidized the "rays" to add more contrast.
More learnings
I want to mention a few other things I learned with this project.
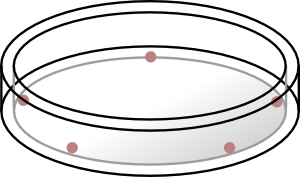
I soldered a bezel onto a small round sheet to create the desired shape. I used four pieces of solder turned into balls and placed them evenly on the inside of the bezel. I've got the size of the balls quite right since I didn't have any residue to clean up. But four of them weren't enough to cover the seam fully. I found a tiny gap in one spot between the bezel and the sheet on the outside. The bottom line is that smaller balls of solder work better for me. I just need to get enough of them in place.
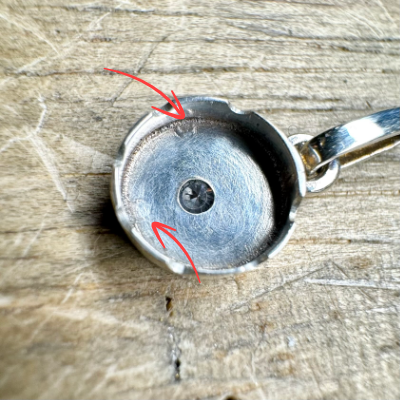
After soldering, I realized that one of the balls was etched into the metal, which is a clear sign of overheating. That's a reminder for myself to be extra careful when heating smaller items. While I've got no fire scale, I've still got this nasty side effect of overheating. The good thing is that it happened on the inner side of the piece. But just to be fair, this can also happen because of dirty surfaces, too.
I figured that a better sequence of operations for me when making a pendant bail is to form and solder the bail itself first. It allows you to form a small, even ring, solder it, and then form it into an oval. Then, you put it in a jump ring and solder the jump ring to the piece.
Before, I'd solder the jump ring to the piece first, and then I'd form an oval bail, put it in a jump ring, and close solder it. To be honest, it's a bit of a painful process because it can be very hard to clean it up, especially on the inside.
Links
Flush-setting tutorial by Nancy Hamilton: https://nancylthamilton.com/techniques/stone-setting/flush-setting-gem-stones/
Discussion on graver heels: https://engraverscafe.com/threads/sharpening-a-flat-graver-for-pave-with-the-power-hone.5313/

Member discussion