Watchtower Set
This jewelry set was inspired mainly by fantasy movies that often depict romanticized medieval age-like stories. While they usually omit some of the realities of that time, many of us still like watching these movies and enjoying the mystical universe.
This setting called for straight lines and thickness to symbolize stability and strength, which reminded me of ancient castles. A subtle oxidized texture would add to the overall ancient feeling.
Before we continue, I want to mention that I'm not a professional silversmith. These are my learnings as a hobbyist. I'm sharing them for informational purposes only, so use them at your own risk.
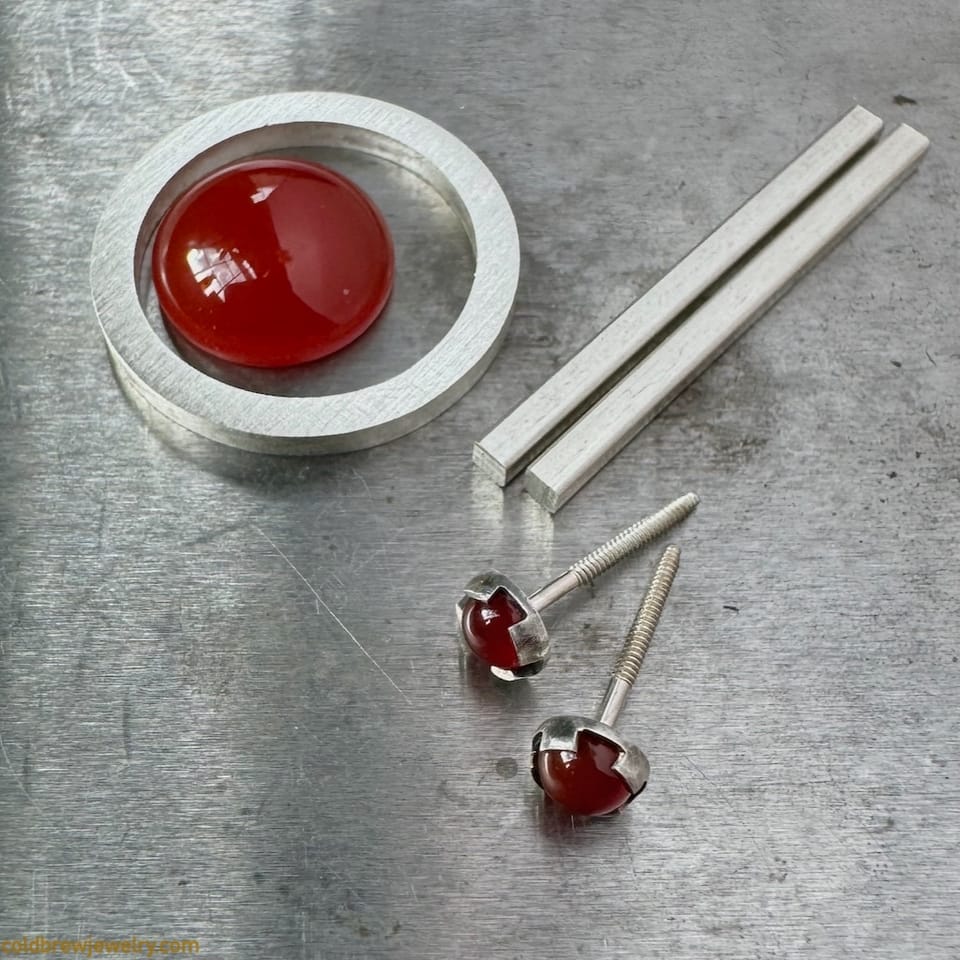
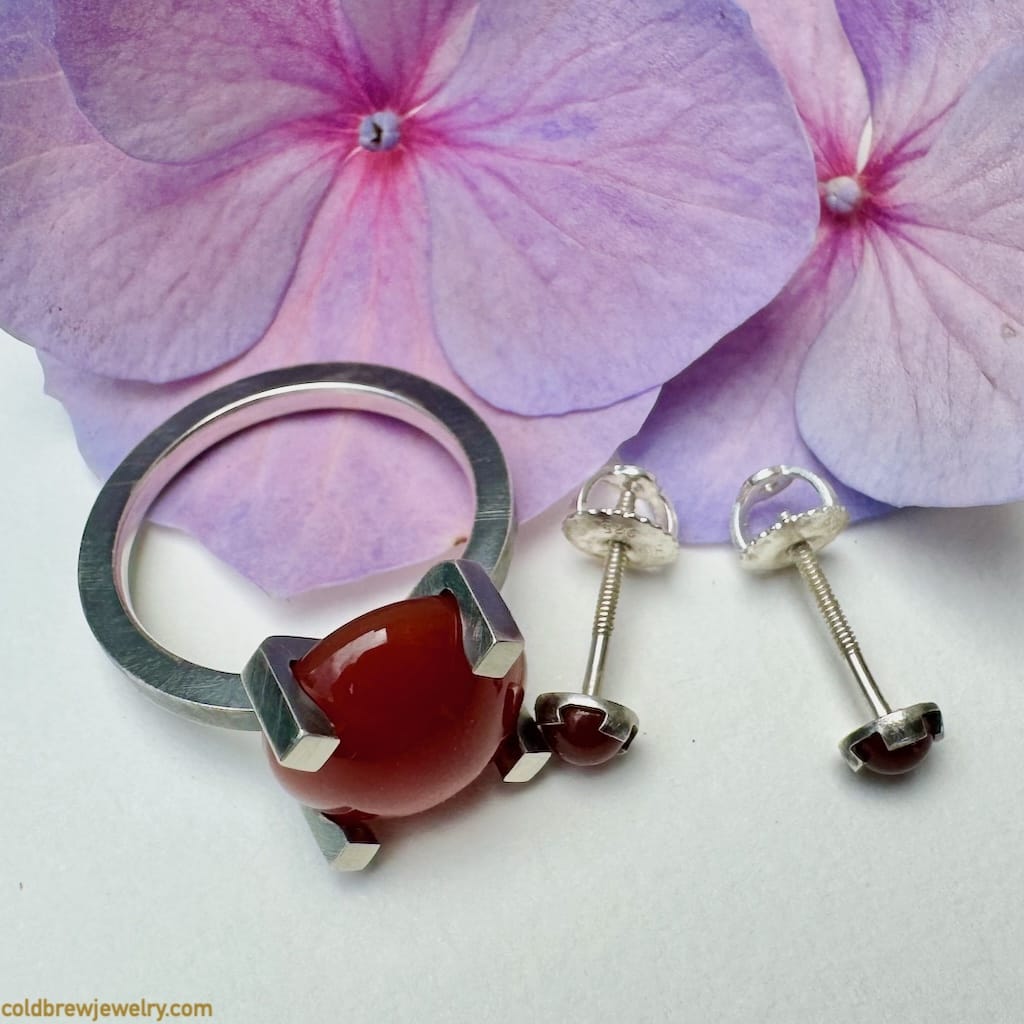
I had three carnelian stones that I was hoping to put to good use: two 4 mm and one 12 mm in diameter. So, I decided to make a ring and two earrings. I didn’t want to go with a traditional bezel setting. I wanted to add some heavy square prongs for the ring. The earrings would reflect the pattern with a pierced bezel.
This is how I pictured the design of the ring and the stud earrings:
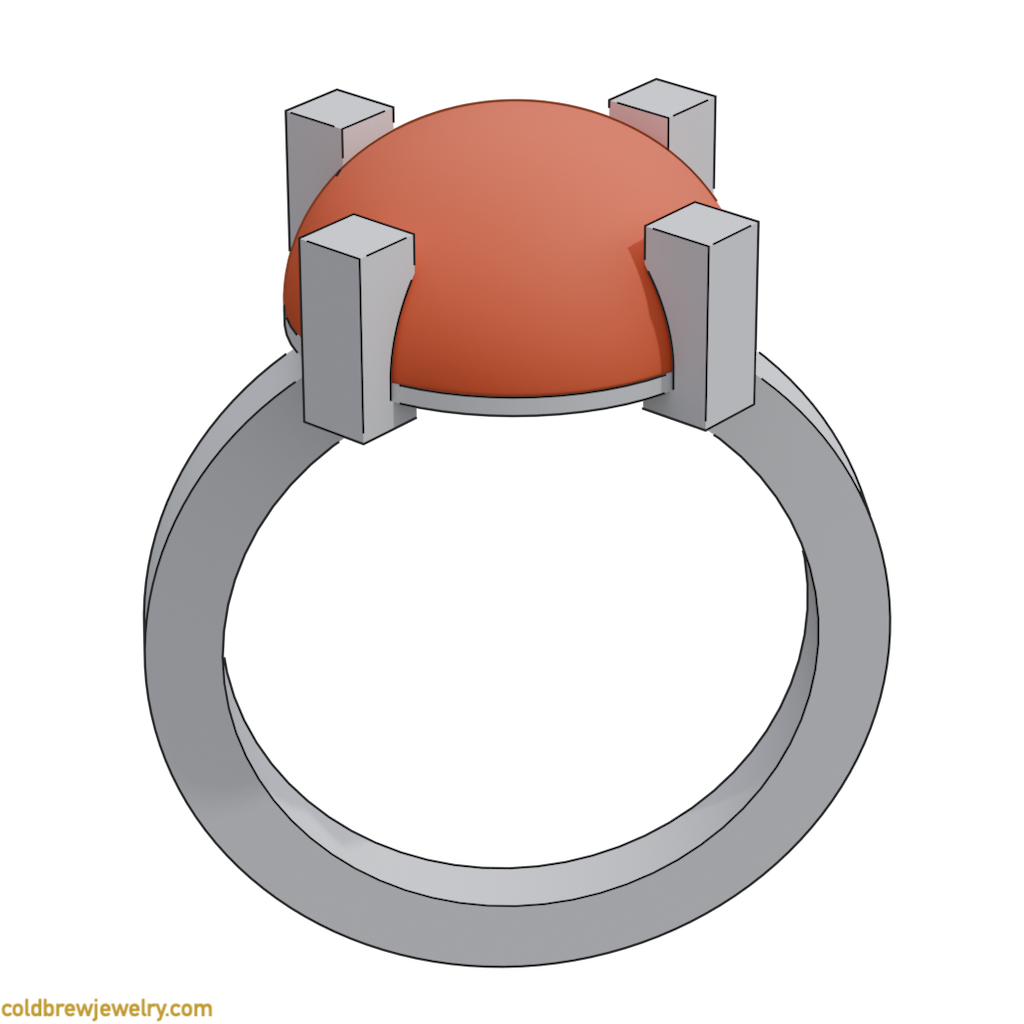
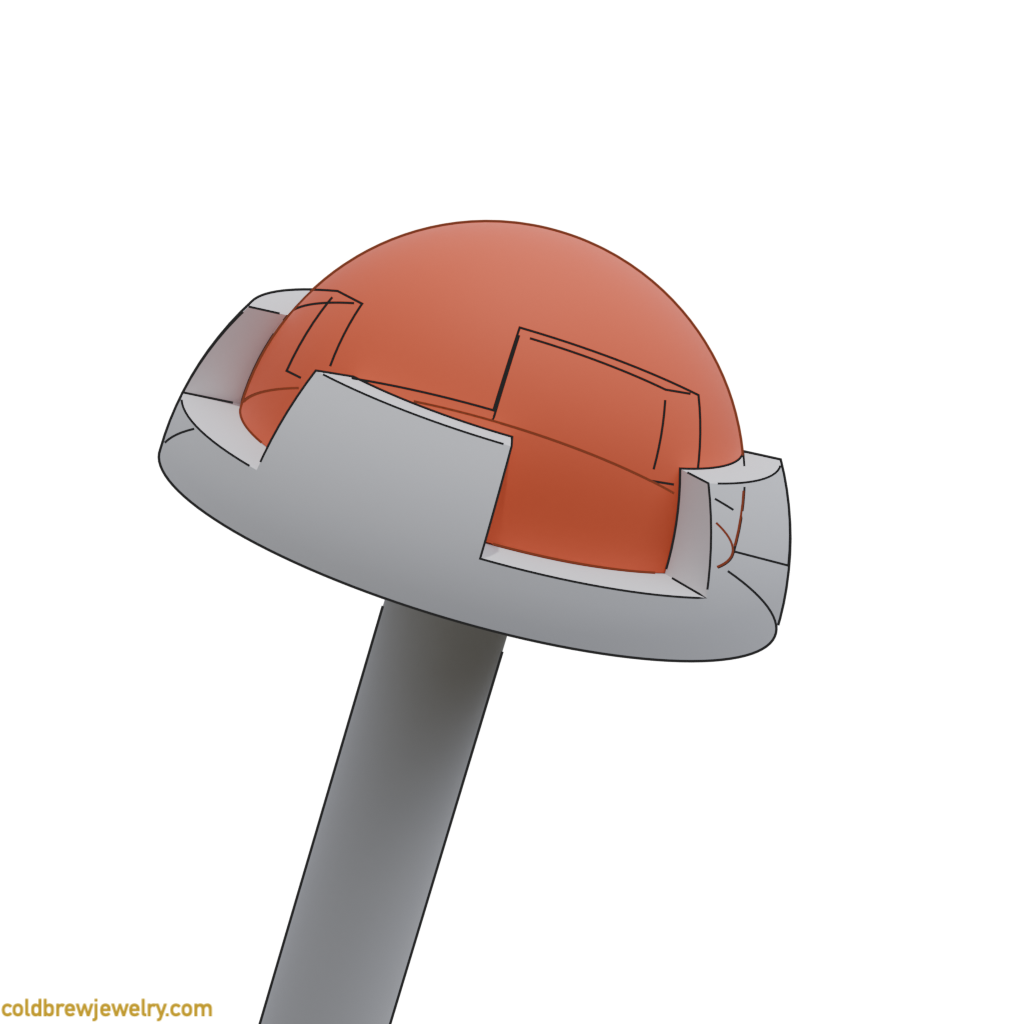
This kind of jewelry might seem a bit rough, but that was the point of the design. I was also going to add some details to make it a bit “warmer” and less aggressive.
Before I continue, I’d like to say a few words about the stones. This is the first time I’ve used a carnelian stone, and I wasn’t impressed initially. But as I started working with it, I realized that its translucency combined with a shiny backplate gives a beautiful play of light. Unsurprisingly, well-known jewelry brands like Van Cleef & Arpels use this stone in their collections.
I wanted to tackle the ring first because I was curious how it’d work out. I created a round backplate from a 20-gauge silver sheet. I wanted the light to reflect and emphasize the stone’s translucency. Then, I made four separate prongs to solder to the backplate. I carved out some space for the stone in each prong to set it later.
I decided to use some soldering clay to hold everything in place. It all looked relatively simple to me, probably even too simple. That’s when I became a bit suspicious. I knew I had to adjust the prongs to allow some space for the stone. I decided to do it sooner to ensure I could tweak them if things went wrong. And they indeed did!
I used my parallel action pliers to hold the bottom side of the prong so that it didn’t break off of the backplate. When I started doing it, I realized that the contact surface area between each prong and the backplate was too small to hold on to its place securely. I had to re-solder one of the prongs because I wasn’t careful enough to open it up. It led to some excess solder in the backplate that I had to clean up. At this point, the backplate looked more like a bumpy road than a mirror-like lake. I had to go back to square one.
While I think this specific implementation is doable, it can also be too time-consuming and not reliable enough.
At this point, I decided to think of an alternate solution and switch to making the studs for the time being.
I want to highlight the importance of switching tasks occasionally, especially when you’re stuck, anxious, tired, or in a rush. All of these conditions don’t make it easier to think clearly. And that, in turn, means more mistakes.
Switching to a different task or, ideally, stepping away from the workbench helps you avoid brute-forcing through the problem.
The studs
Looking at the initial sketch, I found that the best bet for me was to create a bezel and then remove parts of it. This way, it would be easier to maintain the round shape of all the parts. Creating the bezel and soldering it to a plate was pretty straightforward. I described a similar task in my post on practicing flush setting. Two challenging parts for me were making square openings in the bezel and soldering the post to the back of the stud.
Soldering the post
I soldered the post to the bezel first to minimize the chance of melting things later when I cut the openings to set the stone. The trickiest part for me was correctly positioning the post against the bezel. The critical part was finding and marking the bezel’s center. I followed the advice from the Soldering Demystified book (see the Resources page for more information) and marked my soldering board with two lines crossing each other at 90 degrees. This made it easier to position the post at the bezel’s center. Another option is to put your bezel on the printed dividing template and mark four orthogonal points with a sharpie. But I think it’s a bit slower.
Another challenge was keeping the post vertical on all sides. I used cross-locking tweezers with a binder clip attached. It gave me a good 90 degrees against the soldering board on one axis. I had to double-check the other side to ensure the post was vertical.
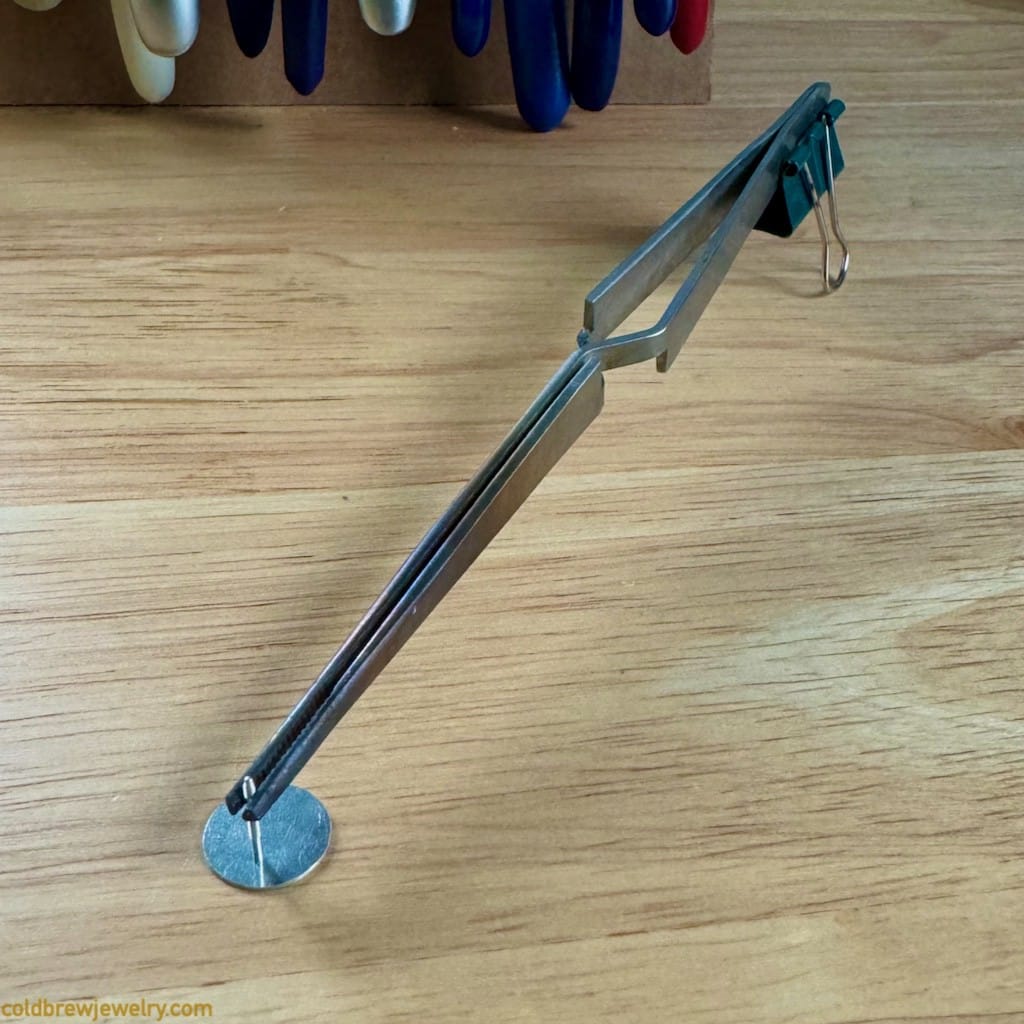
This setup works really well with a solder pallet between the post and the bezel, as you direct the heat to the bezel and not the post when soldering.
Modifying the bezel
The goal was to create four symmetrical openings about 2 mm wide each. My first take was to use needle files. I divided the bezel into four equal parts using a laser-engraved template on my bench pin. I highly recommend printing it if you don’t have one handy.
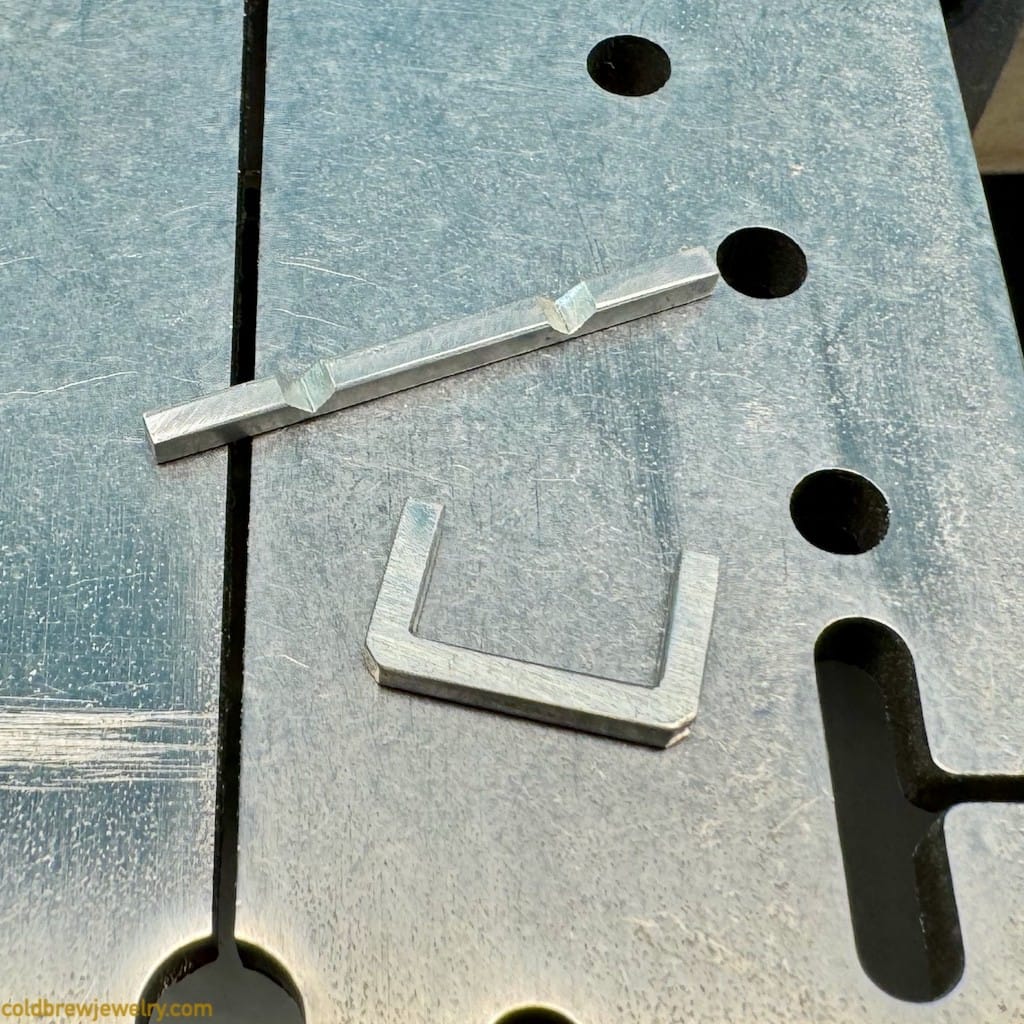
Next, I made two small perpendicular cuts with a saw across the bezel, going about one-third of the width down to the back plate. Then, I used a square needle file to enlarge the cut slightly and switched to a flat needle file.
With the flat needle file, I made an opening down to the plate. Since I was working across the bezel, I ended up with two symmetrical openings, which is precisely what I wanted. I repeated the same process for the perpendicular openings, giving me “claws” to set the stone. While I got the desired result, filing the metal took too much time.
Alternative
I remember watching videos of experienced jewelers making symmetrical cuts to create a gallery setting from a bezel. Impressed by how much time you can save, I’d do the same but fail to keep the cuts parallel. Since then, I’ve done much piercing practice and finally gained enough confidence to do something similar.
I used my saw to cut the openings for the second stud instead of using a file. It saved me a lot of time, indeed. I just used the file to clean everything up. It also gave me more control over the openings’ size and symmetry.
I want to emphasize two essential rules I’m using to keep my geometry even: no force and no rush. As I mentioned above, when I find myself applying excessive force to any operation or growing impatient, it’s a sign that I need to step away before I ruin my work.
Setting the stones
Setting two small carnelian cabochons was pretty straightforward. The catch was with the oxidation and the texture. The idea was to use a fine wheel to apply a satin finish to create some light lines, oxidize the bezel, and use a polishing cloth to reveal some of the metal. Depending on the order of operations, you get different results. I was going to use a liver of sulfur for the oxidation.
But this should be done before setting the stone. The reason is simple. It would be best to heat the metal slightly to get darker oxidation without any rainbow-colored spots. Then, you can use a brush to apply the sulfur solution to the liver. In general, avoiding applying it to the stone is a good idea.
This is where I messed things up a bit. I decided to set the stone first and then do the oxidation. I was afraid that I’d damage the texture with the pusher. As a result, I had to be extra careful with the liver of sulfur. Also, I couldn’t heat the studs properly to get it dark enough because I didn’t want to damage the stone. I ended up heating the studs gently with my torch. I put a drop of water on the metal first to ensure I don’t overheat it. When the drop starts evaporating, it means that there’s enough heat. Then, I used a small brush to apply the liver of sulfur. I use it as gel, slightly dipping my brush in it.
Alternative 1
Most gemstones can withstand the temperature of boiling water. Since silver conducts the heat very well, it only takes a quick submersion in hot water to get hot. Then, you can apply a liver of sulfur. I’d probably use a hot solution to get the right amount of oxidation. The drawback is that the metal would be wet. But if you use the liver of sulfur gel, then it should be fine.
Alternative 2
A better solution would be to oxidize the metal before setting the stone. The order of operations would be to add texture, oxidize, set the stone, and polish slightly to reveal the texture. The tricky part is to keep the texture intact while setting the stone. The tip that most resources suggest is to use an old plastic toothbrush for setting. You can cut and sand it to add some roughness so it doesn’t slip easily. Since the plastic is softer than the metal, it won’t affect the texture. That’s the method I’d use if I were to make the studs from scratch.
If you enjoy reading my posts consider subscribing to my newsletter to get some extra content from me each month. And, of course, be the first to know about the new posts 😊
The ring
By the time I got back to making the ring, I had a different plan for creating a setting. I decided to go without the backplate and create a snug-fit construction instead. I’ve never done such architecture before and was curious to try it.
Here’s what I envisioned:
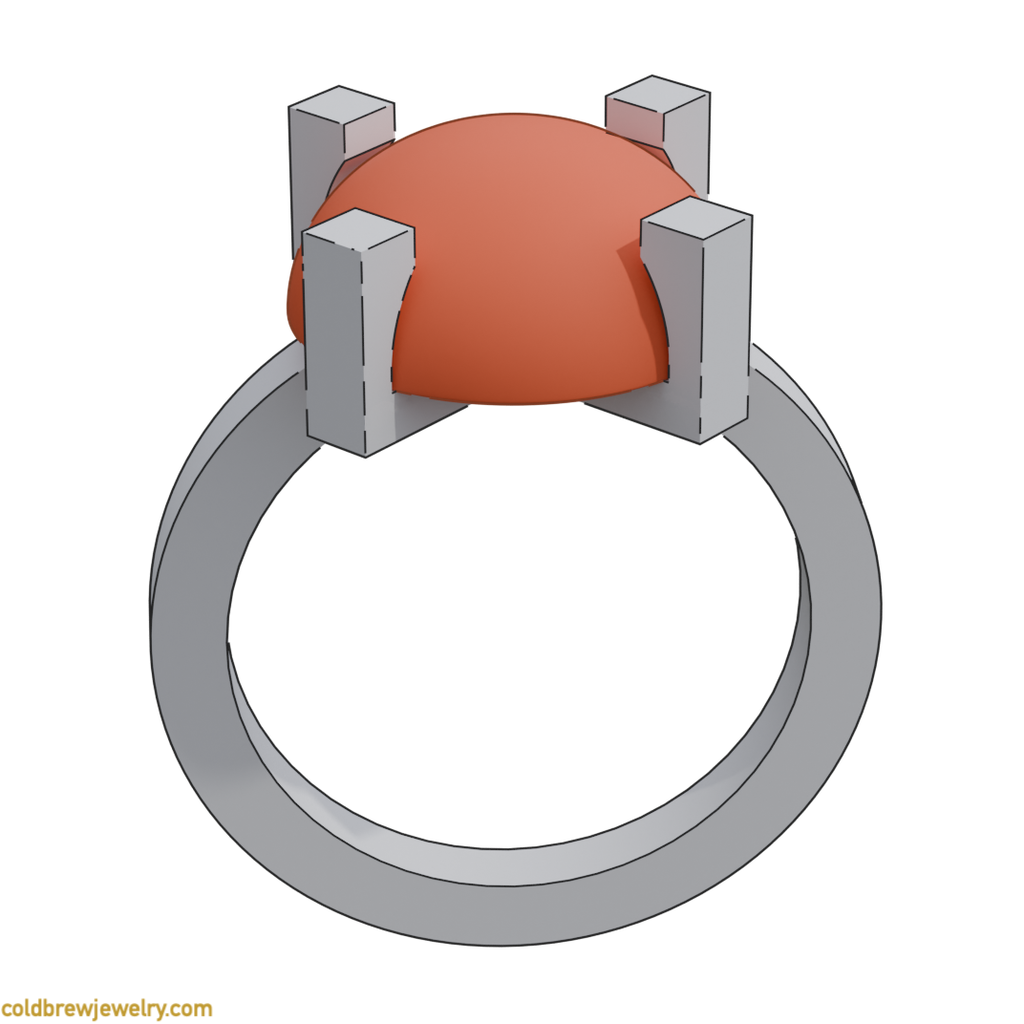
I had to create two main pieces bent at 90 degrees so that they could act as prongs. Then, I had to intersect them so they were in one plane. Finally, the ring shank had to “clip in” diagonally into the setting. The backplate had to be soldered perfectly flat against the setting, too.
These operations were the trickiest and required a high degree of accuracy. The order of operations matters a lot here.
Forming the prongs
I started by creating the prongs I wanted to shape as square brackets. You’d need to score the metal with a square needle file for a 90-degree angle. That’s what I decided to do. The catch was that I had to score a 2 mm square wire. To do that and keep the cut perpendicular to the wire took a lot of time and effort. To make my life a bit easier, I first made a small perpendicular cut with my saw to better position the needle file. I filed through about two-thirds of the wire width before I bent it to form the right angle. Because the wire was annealed, it bent fine. But I’d go three-fourths to make the angle more crisp. Instead, I had to make a slight chamfer, which worked well.
Alternative 1
I tried a different approach for my second “bracket.” Instead of starting with a guiding cut and filing with a needle file, I used my saw to make a 90-degree cut. The depth of the cut was about two-thirds of the wire thickness. Then, I used a square needle file to deepen the cut to three-fourths. It saved me quite a bit of time.
Alternative 2
Another option is to cut the wire completely and make an even 45-degree chamfer using a miter vise. While two pieces of wire align perfectly, the soldering setup becomes tricky. We must put the solder on one side and heat it from the opposite side to pull it through. The pieces of wire need to sit on a perfectly flat surface to align with each other, so we can’t put the solder under the wire. Theoretically, a honeycomb soldering board can be used because it reflects the heat to the metal. But I haven’t tried this setup.
Soldering the prongs
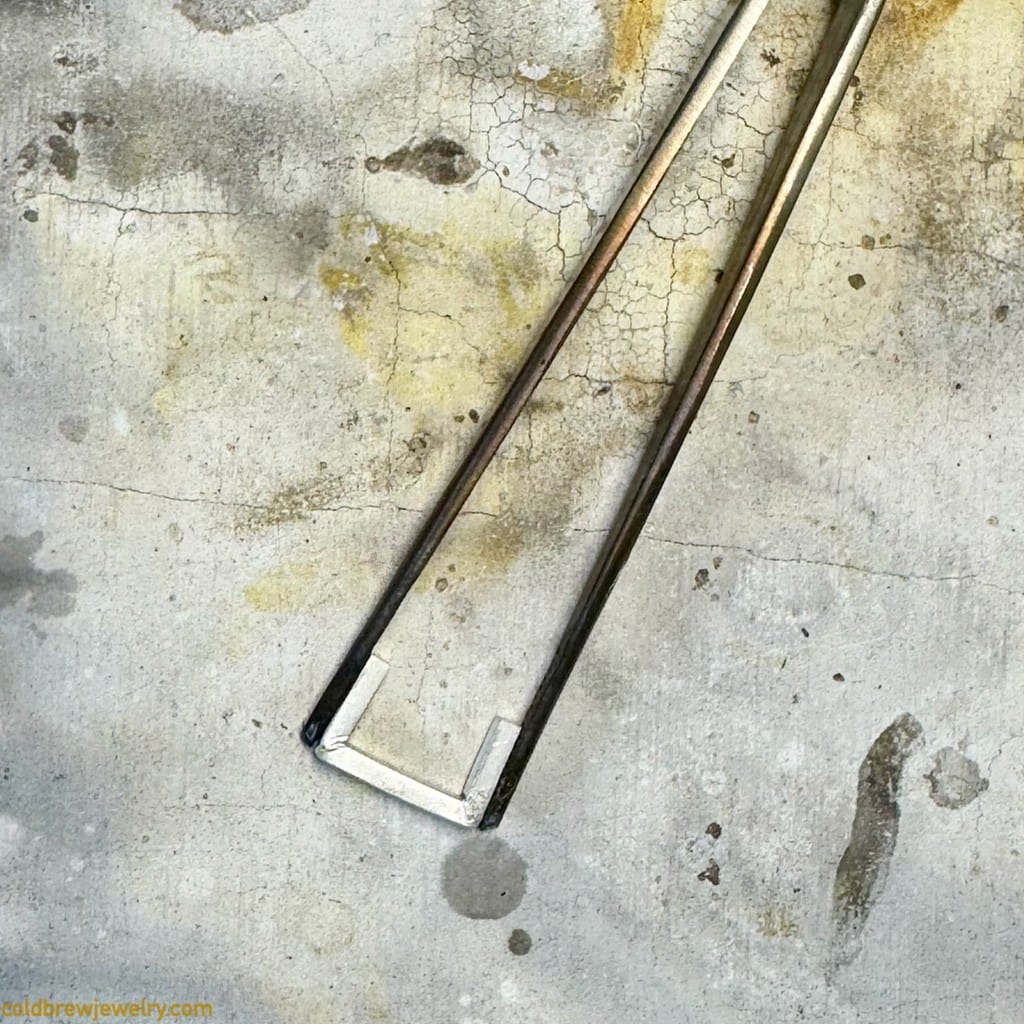
After folding the wire, I would solder it as any other vertical seam. I’d put a piece of solder under it and heat from the top. The issue with the scored folded wire was that it had some springiness that slightly pulled the seam’s sides apart. I had to ensure the sides were firm and flush with each other. I used my cross-action tweezers to clamp the wire bracket.
What didn’t work well
But clamping hollow or hollow-like pieces when soldering is a classic mistake. The reason is that the metal under tension will most likely bend when heated. And that’s precisely what happened. One of the corners collapsed and slid inwards, requiring me to remake the bracket from scratch.
To fix the issue, I used cross-locking tweezers with very low tension to close the corner seams gently.
Alternative
I think a better approach would be to use binding wire. This way, you get more control over how hard you pull the parts together. Actually, this is the standard approach for soldering hollow forms. See, for example, the Soldering chapter in the Workbench Guide To Jewelry Techniques book (you can find a link to the book on the Resources page).
Cutting the prongs
The idea was to keep the prongs as vertical as possible with the stone in place. I calculated the size of the brackets so that the inner space was slightly smaller than the stone’s diameter. It allowed me to cut the prongs to set the stone and keep them vertical. The tricky part was to cut it to the shape. I used cylinder burs of different sizes to create a smooth curve. The critical part was to check often if the stone fitted correctly. The stone had a rounded edge at the bottom, so a cylinder bur worked really well.
Before cutting with a bur, I made a small cut with my saw blade along the inner bottom part of the bracket to avoid scratching it.
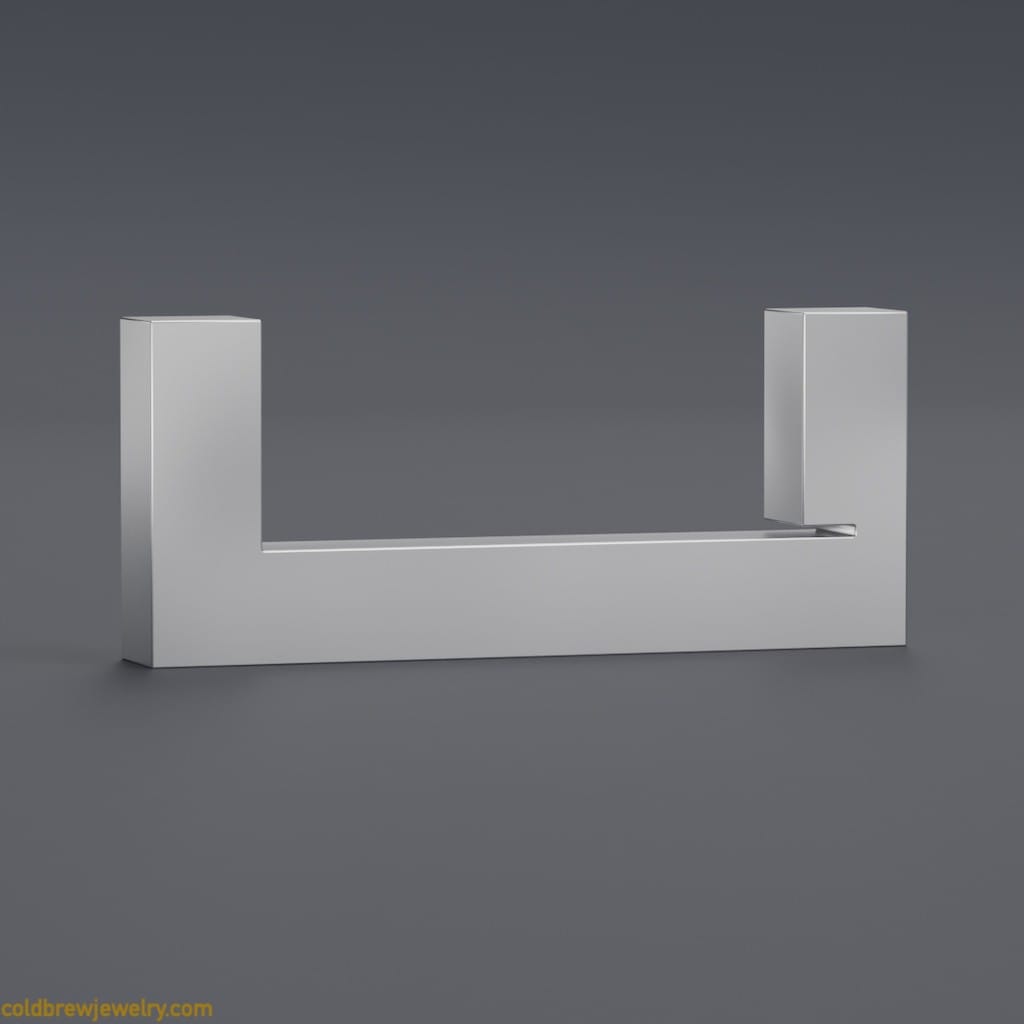
What didn’t work well
For one of the prongs, I tried using a half-round needle file to file the cutout for the stone. It didn’t work well because it required too much time to get it to the correct size. But I used it to clean up the surface after using the cylinder bur.
Making the setting
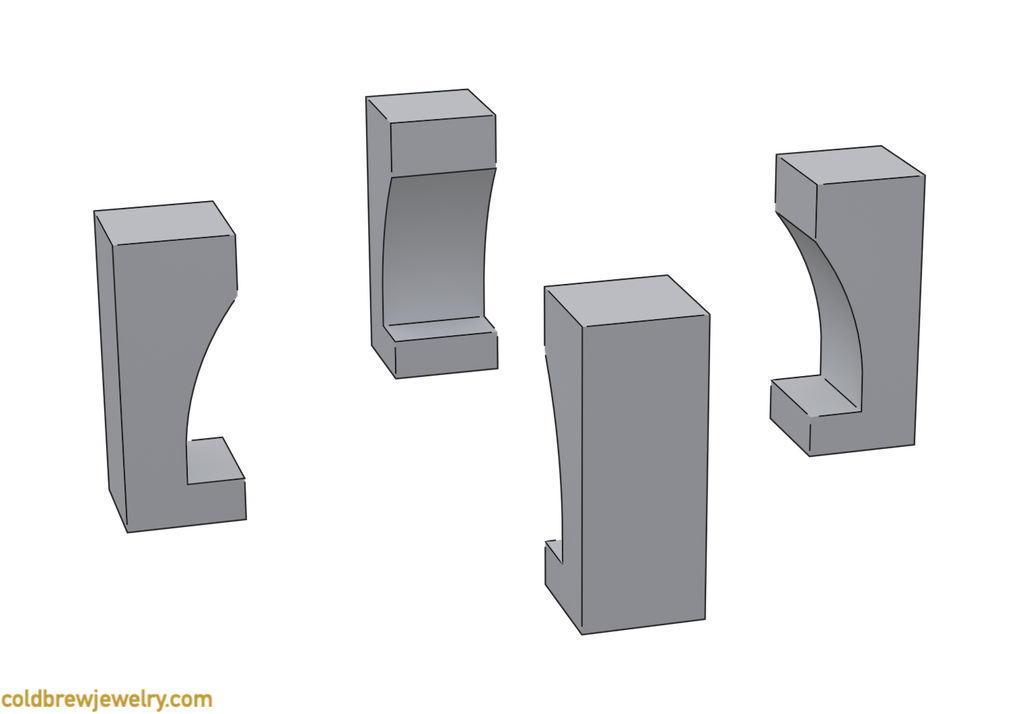
With prongs soldered and cut, I had to combine them to form a setting.
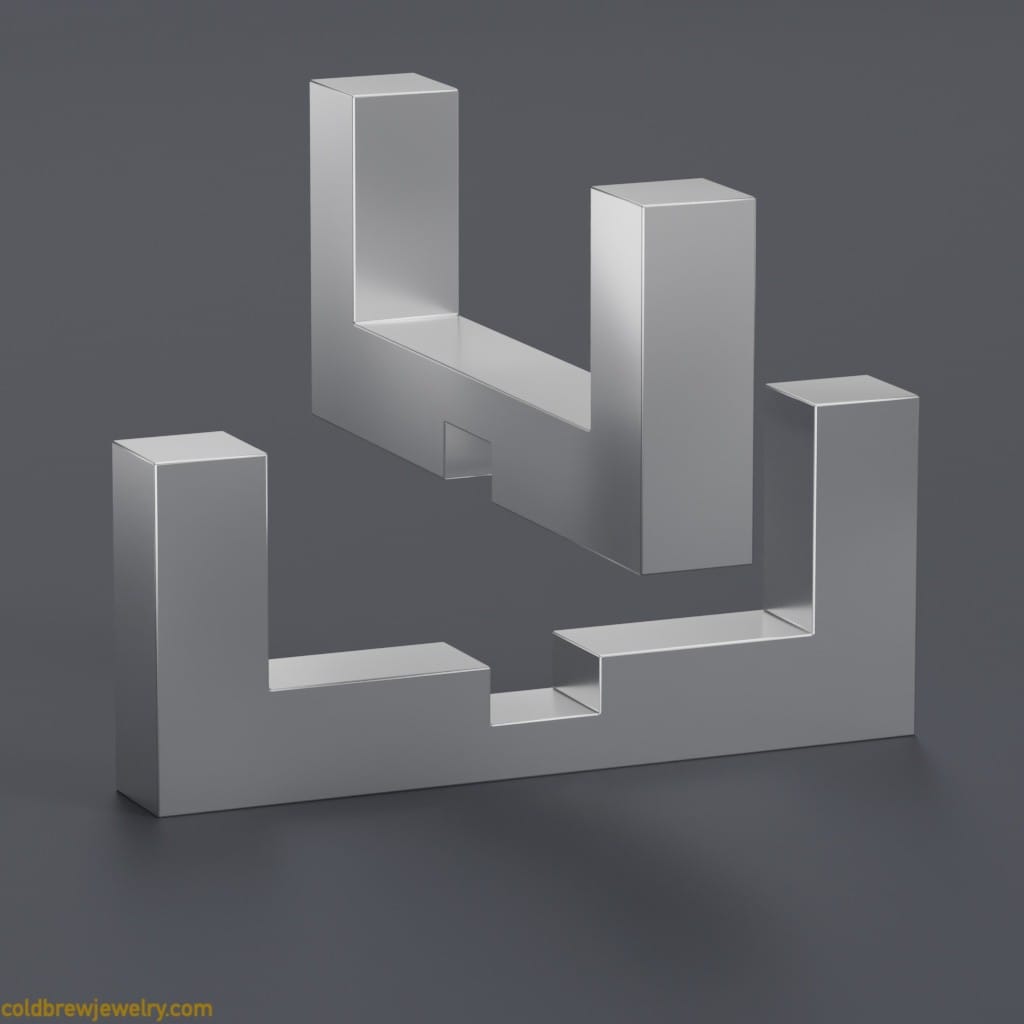
As you can see from the illustration, I had to make rectangular cuts in each prong so that they fit snuggly into each other. The cuts had to be precise so that both pieces fit into place. This is when I realized that the order of operation should have been different. I should have cross-connected the wires first and then formed the prongs. This way, it would have been easier to create rectangular cuts and clean up the crossed wires after soldering.
The key to getting the right fit for me was to check often after every small operation. I used my saw blade as a file to gently deepen the cut and even out the sides. The tricky part is that when you put the pieces together, it’s tough to see where you need to remove the metal for everything to get into place. To make it easier, I used a regular section of the wire without a cut to see if it fits evenly and deep enough. However, I removed too much metal where I shouldn’t have, and the connection became a little loose. As I mentioned, the point here is that you must be very careful and move slowly while regularly checking for the correct fit.
If you have a snug fit, the soldering should be pretty straightforward. I used a couple of balled-up pieces of solder and heated the settings from the top.
Alternative
I should have used a small titanium clamp to hold the pieces together at the crossing point, ensuring a tight seam during soldering. Without it, the top bracket ended up about 0.2-0.3 mm higher and not entirely flush with the bottom one. I had to file it down, which was pretty tricky considering the shape of the setting.
Preparing and soldering the ring shank
I made the ring shank from a 2 mm square wire—nothing fancy. One thing I did, though, was use a bur removal tool to create a chamfer on the inside of the shank. Later, I made it a nice smooth bevel, which added some contrast to the shape edges of the ring and the setting.
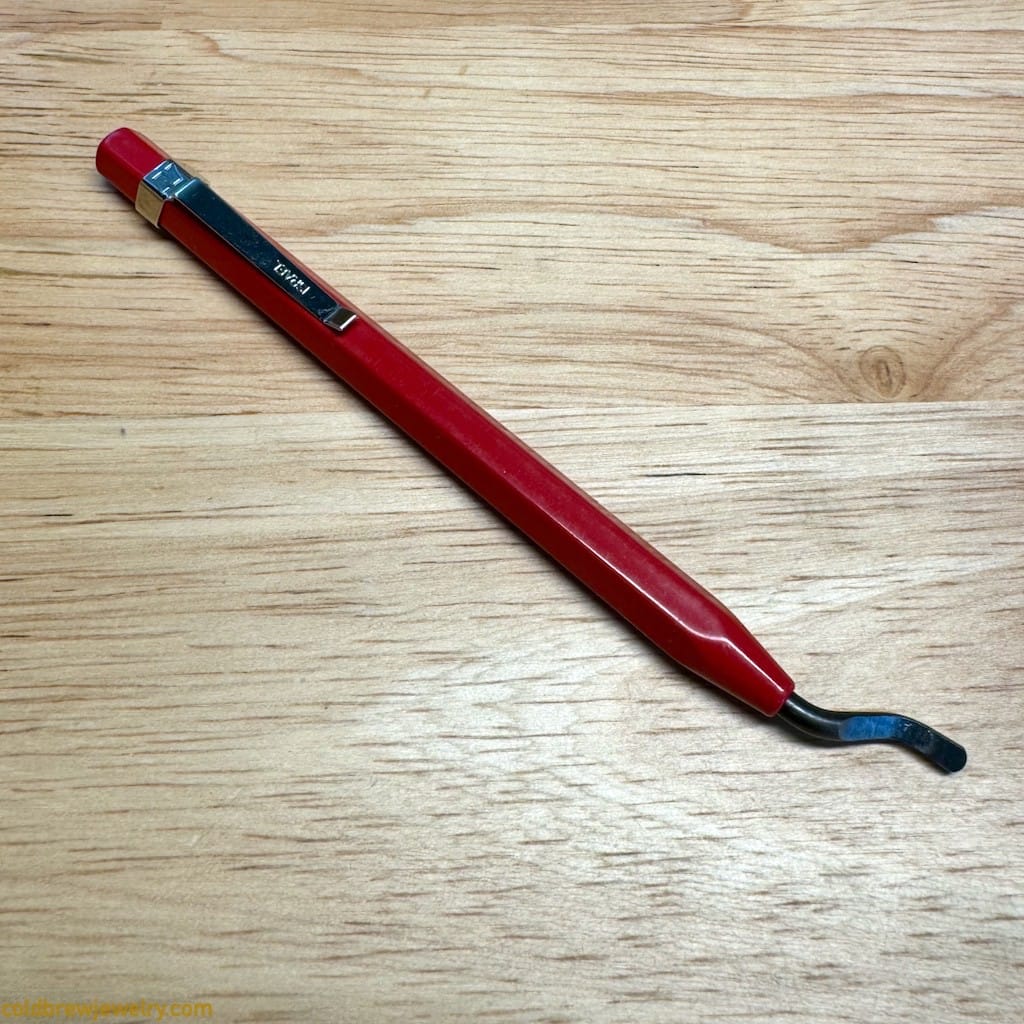
But I had to solder it to the setting so that it would look compact and be sturdy. I decided to use one of the setting’s diagonals. This had to be another snug-fit connection.
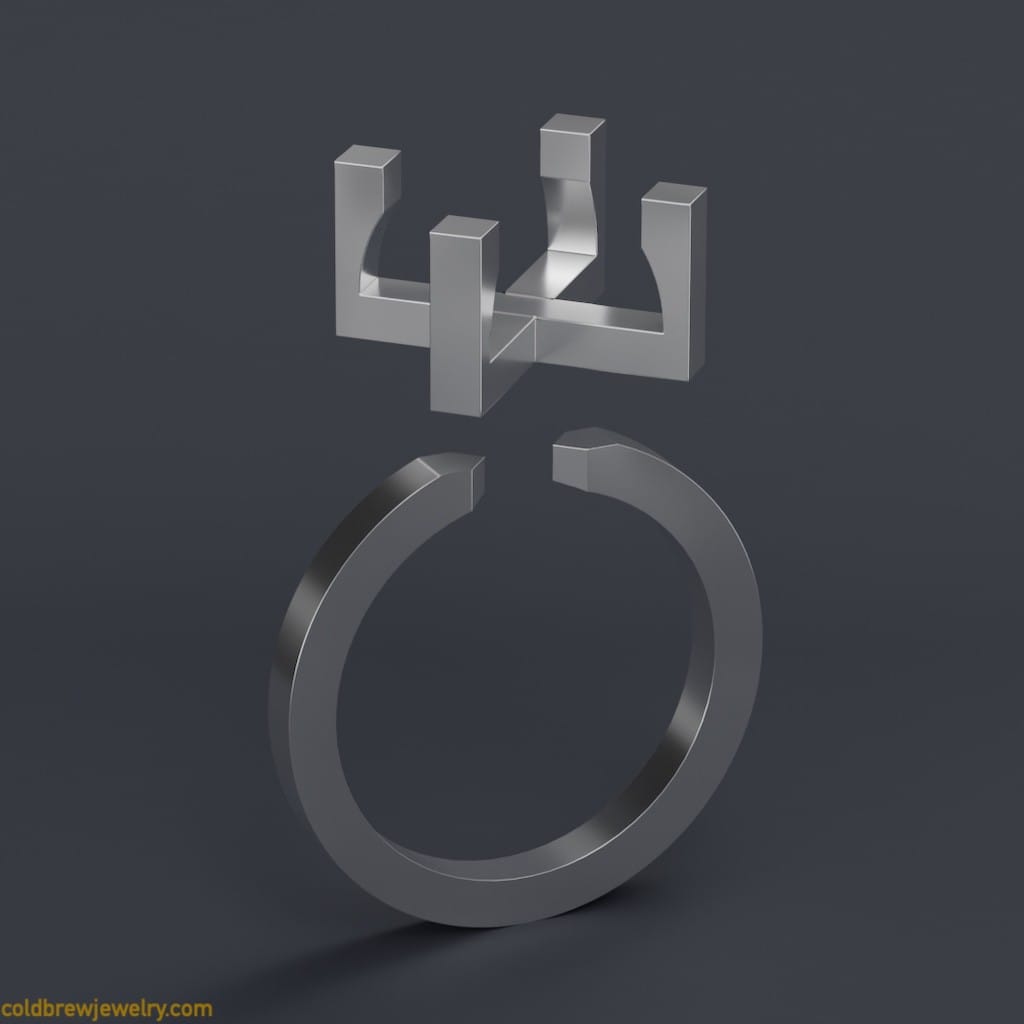
I used my dividers to mark up the shank and made the cuts. Then, I used a needle file to clean everything up. One thing to remember here is that the cut shouldn’t be perpendicular to the shank surface. For example, the saw shouldn’t be pointing to the center of the shank while cutting, as you can see in the illustration.
I used medium solder to ensure that the previous joints didn’t melt. I usually prefer using hard solder as much as possible, but when it comes to soldering right next to existing joints, I switch to medium.
Texturing and oxidizing the ring
After minor cleanup, my ring was sanded to 1000-1200 grit. Next, I wanted to apply some slight texture and oxidize it. At the same time, I wanted the inner bottom side of the setting to stay bright to reflect the light under the stone. I first tried this texture on scrap silver to see if it looked good enough. I really liked the result!
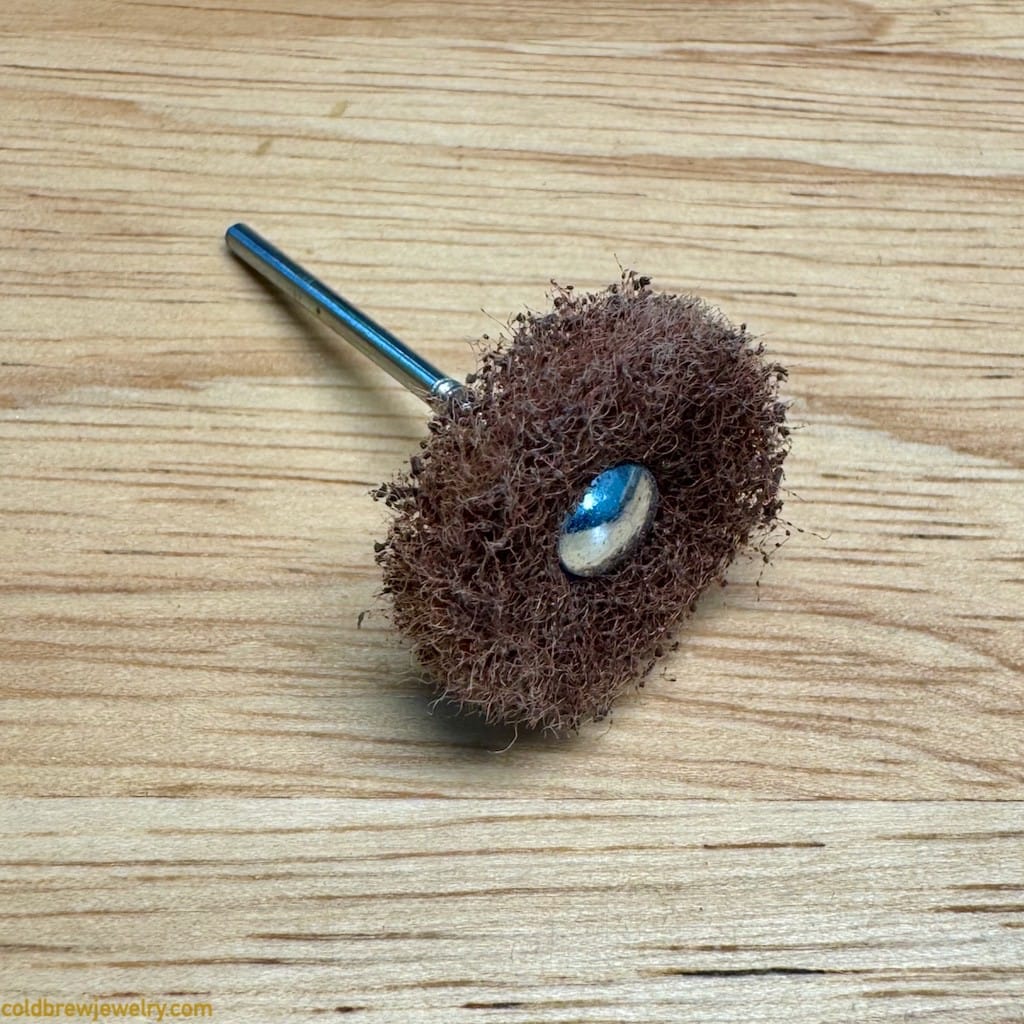
I started by applying the texture using a soft wheel for the satin finish in an “x” pattern. The key was to apply it gently to mimic a wear-and-tear look and leave some of the first-pass marks while making the second pass.
Since cleaning up the oxidation from the inner part of the settings didn’t seem fun, I decided to use a small brush with my liver of sulfur gel. To ensure the patina layer was dense enough without rainbow traces, I heated the ring slightly with my torch before applying the gel. I had to heat untreated parts again because the ring cooled down while covering it.
Next, I wanted to reveal some of the oxidized texture to make it stand out. I used a regular polishing cloth with some rough applied. This gives the metal a shiny look but keeps the texture in place since rouge is not too abrasive. I wanted to do it before setting the stone because it would be tough to reach some spots with the stone in place.
Alternative
Another option is to use some polishing paper. The coarser the grit you use, the less shiny the metal becomes, and the easier it is to reveal the texture. The drawback is that if your texture is light, you might accidentally polish it out. Check out this tip on the Metalsmith Society page to see the polishing paper in action.
You can see the oxidized texture below in one of the close-ups.
Setting the stone
I had to open the setting slightly for the stone to get in place. As you remember, the “prongs” for the setting were made by scoring and soldering the wire. No matter how strong the soldered seam was, there’s always a chance of accidentally opening it up while bending the thick prongs. I didn’t want to trust thermoplastic to keep that 45-degree seam safe. So, I had to go for a compromise. I used my round pliers to hold each prong at its base and bend it with the nylon pliers. It kept the seam intact but added some dents. But since the prongs were thick enough, I wasn’t too worried about them.
Alternative
I could have used my vise with brass jaws to hold the setting by its sides to prevent the seam from bending too much. This would have also helped with the dents from the pliers.
Next, I put the stone in and had to close the prongs. Carnelian, a form of chalcedony, generally has good toughness. This means that it can withstand some pressure without breaking. Also, it scores between 6 and 7 on the Mohs Scale, which makes it relatively scratch-resistant. Nevertheless, I wanted to be extra careful when closing such heavy prongs. I used my vise with the brass jaws to pre-close the prongs. I put the setting in the jaws and started closing the vise slowly. It worked out really well. It gave me perfect control over the position of the prongs. After that, I used my Delrin pliers to close the prongs further without deforming any sharp edges.
What I could have done better
I could have used my regular flat pliers instead of Delrin pliers. Later, I had to adjust the length of the prongs anyway. Steel pliers would have allowed me to close the prongs better and make them tighter to the stone.
Finishing up
After I closed the prongs, I had to trim them a bit to make them look better. Since they were rather heavy, I cut them to a certain length with my saw. After cutting the stone, I used a file and sanding sticks to clean up the cut.
What I could have done better
I should have protected the stone with masking tape before filing and sanding. I ended up with one tiny scratch, which I had to remove with a diamond wheel.
I also sanded the outside of the prongs to remove the marks from my round pliers. At this point, I decided to keep the top side of the prongs without any oxidation. A shiny satin finish looked perfect. But I wanted the outer side to look like the rest of the ring. I started by applying the same texture. Then, I had to use some liver of sulfur. I decided to risk it and heat each prong slightly with my butane torch, and it worked out perfectly. Of course, I wouldn’t do it with a stone like opal. But also, I wouldn’t use an opal in this design since it’s a relatively brittle stone. After oxidation, I used a polishing cloth with rouge to reveal the texture.
Finally, I polished the inner side of the ring to a mirror finish. This contrasts nicely with the rest of the ring, making it nice and smooth to wear.
Final Thoughts
I’m pleased with the result. It delivers my initial design idea and is pleasant to look at. This project took me a while to finish. To be honest, it felt like it took forever. But in hindsight, I understand that it was a combination of factors:
- The complexity of the project.
- I had to learn new techniques, like cross-joining two pieces of square wire.
- Some failures along the way that made me re-make some things from scratch.
- I had to take care of some personal things that usually happen this time of the year.
- Learning 3D modeling to deliver better illustrations for this blog.
In the future, I plan to diversify my jewelry-making projects and consider other life events that I can foresee or plan.
You can check my Instagram account for more pictures and videos.
If you have any questions, feel free to DM me on Instagram. Don’t forget to subscribe to my newsletter to be informed of new posts and receive some extra content!

Member discussion